Potatoes Growing Guide
| PREPARING THE SEED |
Open all bags upon arrival and inspect the tubers. If you are unable to plant them immediately, the seed should be stored loosely in a cool, dark place. Humidity is necessary as the seed should not be allowed to dry out. If you put the bags into a refrigerator (these dehydrate the potatoes), leave the tubers in the bags we sent you and put those into a doubled-up supermarket paper sack and seal it well. This will sufficiently slow down moisture loss while permitting the seed to breath adequately. We do not use chemicals to prevent our potatoes from sprouting. So the seed potatoes you order may have already begun to sprout when they arrive. This is okay-in fact some consider it desirable. Please handle them carefully. When examining them, chitting, cutting or planting, leave the sprouts on. If you break sprouts off you will delay emergence of the vines; and, you will greatly increase the number of vines that finally do emerge from each potato, greatly reducing the ultimate size of the potatoes you will harvest. All tubers the size of a hen’s egg (1-3 ounces), may be planted whole. Ones this size are highly desirable. Professional potato growers call these “single drops.” We try to manage our seed potato fields so as to produce as large a proportion of single drops as possible. Larger tubers give the grower a dilemma. As a general rule the larger the seed piece, the larger the crop both in terms of size of individual potatoes and overall yield. On the other hand, the larger the seed pieces used, the more seed it takes to plant a given area. At minimum, however, each piece should weigh at least 2-4 ounces and must contain two or more strong eyes. Most people cut up larger potatoes into pieces immediately before planting, using a clean, sharp knife. Seed may be allowed to “heal over” for a day prior to planting, but must not be allowed to dry out. Spread the cut pieces out on a table in the shade or one layer deep in shallow boxes. Do not put in direct sunlight; avoid shriveling the seed pieces, which will weaken them. Growers dust newly-cut pieces with fungicide to guard against scab or reduce the threat of infection by bacteria or fungus. Organic gardeners may use powdered sulfur, placing a teaspoonful or two in a large paper sack and gently tossing the cut potato pieces to cover them with sulfur dust.
| SOIL PREPARATION |
The ideal potato soil is deep, light and loose, a well-drained but moisture retentive loam. Most potato varieties are very aggressive rooting plants, and are able to take full advantage of such soil. In ideal soil potatoes can make incredible yields. Fortunately, the potato is also very adaptable and will usually produce quite respectably where soil conditions are less than perfect. Because of this, many people who grow their own food on marginal agricultural ground depend on the potato for their very survival. All soils, be they ideal of too heavy or too light, should be deeply fitted before planting by sub-soiling or double digging and by incorporating organic matter. Humus is important. It lightens and aerates heavy ground while it increases the moisture holding capacity of sandy earth. And humus adds the organic component of fertility that potatoes need to be truly healthy. Potatoes especially thrive one newly plowed pasture land, a circumstance a bit difficult for most vegetables because of the large number of weed seeds. The frequent hoeing used to hill the crop up keeps weeds under control while the high levels of organic matter from the rotting sod keeps the soil light and loose. Potatoes do best in soil with a pH ranging from 5.2-6.8. Alkaline soil will tend to make many varieties get scabby.
Potatoes also respond to calcium, but newly-applied agricultural lime can induce scab so if lime is needed, far better if it was added the previous year. On soils already above 6.0 we recommend using a little gypsum to supply calcium while leaving the pH just about unchanged. Gypsum applied at 1 ton/acre (that’s 5 pounds per 100 square feet) provides all needed calcium. As far as NPK goes, potatoes need well-balanced nutrition. Properly made compost at 5-10 tons per acre (25-50 pounds per 100 square feet) mainly dug into the rows below the seed is generally sufficient to produce a fine crop, while also supplying all the organic matter most soils need. If the compost is not “strong,” we recommend supplementing it with fertilizer, but not too much. Potatoes given too much nitrogen grow lots of leafy vines but make few tubers. Too much potassium and your tubers may contain less protein. Organic gardeners may use any kind of seed meal cottonseed, soy, linseed, canola, etc.), dug in with compost at a rate of about 1-2 gallons per 100 row feet. Alfalfa meal or chicken manure compost also works fine used at twice that rate.
| CHITTING OR PRE-SPROUTING |
The practice of greening and pre-sprouting seed potatoes before planting them out encourages early growth and hastens the development of marketable tubers. The method is simple: spread the seed tubers in open -top crates, boxes or flats, one layer deep with the “seed end” uppermost. (If you’ll closely observe a seed potato, you’ll notice that one end was attached to the plant, the other end has a larger number of eyes from which the sprouts emerge. This end with the eye cluster is called the seed end.) The flats are kept in a warm place (70 degrees F.) w here light levels are medium in intensity (bright shade). The warmth stimulates the development of strong sprouts from the bud eye clusters, which in the presence of light, remain stubby and so are not easily broken off. Usually seed potatoes are greened up starting a week or two before planting. Do not cut the seed before greening it up. It will dry out. Cut it just before planting.
| PLANTING |
Seed potatoes can rot without sprouting in cold, waterlogged soil, so planting extremely early can be risky. Optimum soil temperature for good growth ranges from 55 deg. F. to 70 deg. F. A small planting of the earliest early potatoes may be attempted by planting 6-8 weeks before the last frost date. If a late frost burns the vines back to ground level the tubers will make more sprouts, but each time this setback happens the final yield gets later and smaller. Your main crop should be sown so that there is virtually no risk of frost blackening the emerging vines. The width between rows and overall plant spacing is determined by the size of your garden, your method of cultivation and the amount of irrigation you have available (or wish to use). Farmers and market gardeners need 36-42 inches between rows to permit efficient cultivation and hilling. Gardeners can get by with as little as 2 feet between rows. Where water is short or irrigation will not be used and soil is open and loose so plants can take advantage of this much rooting space, row spacing can be increased to as much as 5 feet and the individual seed pieces separated as much as 18 inches apart, giving the plants a large area in which to forage for moisture. Of course, with wide spacing like this combined with the effects of moisture stress, yields will be lower. Whatever your row spacing, dig a shallow trench about 6-8 inches deep. Plant the seed pieces 10-14 inches apart in this trench. Using a rake, cover the seed with 3-4 inches of soil-do not fill the trench completely.
| HILLING |
Hilling is crucial to creating a place for potatoes to develop a large size and abundantly. Sprouts will emerge in about two weeks, depending on the soil temperature. When the stems are about 8 inches high, gently hill the vines up with soil scraped from both sides of the row with a hoe. Doing this simultaneously weeds the row. Leave about half of the vine exposed. Hilling puts the root system deeper where the soil is cooler while the just scraped -up soil creates a light fluffy medium for the tubers to develop into. All tubers will form between the seed piece and the surface of the soil. Another hilling will be needed in another 2-3 weeks and yet another as well, 2 weeks after the second. On subsequent hilling, add only an inch or two of soil to the hill, but make sure there is enough soil atop the forming potatoes that they don’t push out of the hill and get exposed to light (or they’ll turn green). But if you hill up too much soil, you’ll cover too many leaves and reduce your final yield.
| HARVESTING |
Normally, seven or eight weeks after planting, the earliest varieties are blossoming. This signifies that early potatoes may be ready, so gently poke into a potato hill by hand to see what you can find while making as little disturbance as possible. You may either “rob” a few plants of a potato, or simply harvest an entire plant from the end of the row. “Rob” gently to avoid injuring growing roots and stressing the plant. The main crop. Later varieties are usually grown for winter storage. The ideal time to harvest is when the vines are dead. It is best to wait until heavy frosts kill the tops off or, if your tubers are fully-sized up but no frost is in sight, you can mow the tops or cut them off by hand with a sickle. But if you can wait for the tops to die back naturally, your harvest will be a little bigger and your potatoes just a tad richer. Drier soil is definitely an advantage when harvesting; the tubers come up a lot cleaner and with much less effort. After the tops are dead, rest the tubers in the ground, undisturbed for two weeks to “cure,” while the skins toughen up, protecting the tubers from scuffing and bruising during harvest and storage. Minor injuries in the skin may heal if allowed to dry. It is better to harvest in the cool morning hours. You want to chill your tubers down as fast as reasonably possible and if they start out cool it will be much easier. If hand digging, place your fork outside the hill at first and lift the hill from outside so as to avoid stabbing a potato. If the soil is wet, let them air-dry on the surface for a few hours before gathering them. If the weather is unsettled and you still must harvest, spread the potatoes out under cover and let them air-dry before storing. Then “field-grade” your harvest. Separate out and discard (or set aside to eat immediately) any blemished, scabby, misshapen, or injured tubers. Do not put cut or damaged tubers (those injured during harvest) into a sack of good ones; they will rot and rot other potatoes with them.
| WATERING |
In most parts of the United States, potatoes can be grown without irrigation if the soil is deep and open, where there is no hardpan that restricts root penetration, and the soil is not composed entirely of coarse sand or too gravelly. In fact, there are some definite nutritional and quality advantages to accepting the significantly lowered yield that happens when potatoes don’t receive all the water they could use. Simply stated, un-irrigated potatoes are less watery and taste better. The skins are also tougher so the tubers store better. There is some evidence that potatoes grown this way have a higher protein content as well. However, if irrigation water is scarce or not available the potatoes must be given more “elbow room,” so they can forage for their water without having to compete with other potato plants-and very importantly, the weeds must all be eliminated so they also don’t compete for soil moisture.
| FERTILIZING |
After emergence and until blooming ends, we highly recommend foliar spraying every two weeks with fish emulsion and/or a good liquid seaweed extract like Maxi-crop. You can’t beat foliar sprays for ease of application, and the plants really respond with a burst of vine growth that will result in a higher yield at the end. Spray in the morning while it’s still cool and the dew lingers on the leaves. This way all the fertilizer is absorbed. The best time to make the first application is the day before you hill up the vines for the first time. Once the vines are in full bloom, they stop making much new vegetative growth and begin to form tubers. Additional fertilization at this stage is virtually pointless and may hinder the flavor.
| POTATO TROUBLES |
AVOIDING PEST AND DISEASES
An ounce of prevention is worth a pound of cure! Here are some tips to help you avoid the worst potato diseases and pests. Soil is everything! Build and maintain a healthy, well-balanced soil and your plants will naturally resist disease and damage from predatory insects. If you’re uncertain as to how to do this, we sell a couple of fine books on the subject. Scab. Avoid un-composted animal manures, alkaline soil, and water-logging on potato ground to avoid scab. Where scab has been a problem, try acidifying your soil pH by incorporating small amounts of elemental sulfur into the rows several weeks before planting. Disease. Don’t grow potatoes in the same ground more than once in three years. Many diseases, like early or late blight and verticulum wilt are soil borne. Insect pest populations can also accumulate in a spot. Other members of the nightshade family (tomatoes, peppers, eggplant) should not precede nor follow potatoes.
INSECTS
The most basic rule: to avoid insect problems have vigorously growing, healthy vines. Plants putting on lots of leaf rapidly can generally withstand some predation without a significant loss of yield. We avoid planting too early. Leaf-eating insects can become a much more serious problem once vine growth has stopped and tubers are forming. The tubers store the food made by the leaves; if too many leaves are lost the tubers can’t develop properly. The Colorado Potato Beetle is the most widespread and destructive potato pest. Both adults and larvae feed on leaves and stems, sometimes defoliating entire plants. Handpicking the beetles off the plants is fine control in a small garden, if you catch the problem early. Drop the beetles into a container and then smash them all at once. Check also for small yellow eggs, in clusters, on the undersides of leaves and crush these immediately. Beetle eggs over-winter in the soil, especially at the edges of the garden. Rotation of the farm potato crop is essential, but rotation in a backyard won’t do much good for this mobile pest; you have to move the potato patch more than just a few feet. Bacillis thuringienses (Bt.) var. San Diego, is an effective botanical control, but unfortunately, only for the larvae. The adults are not harmed at all. Hours after the “worm” eats a bit of treated leaf, it becomes so sick it can’t eat again and dies within a day or two. Then the bacteria multiply within the larvae’s decomposing body and are later released into the environmental background to kill still other beetle larvae. Even growers with small gardens should consider Bt. because this bacteria, once established, persists in the area for years and continues to significantly reduce the number of those insects who succumb to it. And if Bt. is sprayed frequently it can virtually eliminate the problem. Start with spraying as soon as there is anything in the garden for the beetles to eat and spray every 10 days to two weeks. That way no larvae get a chance to become adults and your problem may “peter out” before the potato vines are significantly damaged. Bt. is a bacteria not significantly different than the ones that make yogurt. Bt. is entirely nontoxic to humans and other animals and harmless to most insects as well; you can immediately eat food sprayed with it. If adult beetles are causing too much trouble, Bt. will not help until the next cycle has come around. For adults, the organic gardener can use 5% Rotenone dust or a Pyrethrum spray. Flea beetles can also make so many pinholes in leaves that the overall yield suffers greatly. The health of the vines has a great deal to do with how much interest flea beetles have in a plant. So the best prevention is total soil fertility. Sometimes spraying fertilizer like fish emulsion and/or liquid seaweed can lessen the interest flea beetles may have in a potato patch. Rotenone and/or Pyrethrum controls flea beetles, too. If you are having flea beetle problems, you should consider improving your soil’s fertility next year.
| ALTERNATIVE PLANTING METHODS |
MULCHING
If your soil is shallow, rocky or contains so much clay that the forming tubers can’t push it aside as they try to swell up, or, if you grow potatoes where the summer’s heat is intense, or if you have problems with potato scab in your soil, growing in mulch may be your solution. Prepare your seed bed as deeply as possible and make it fertile, just as you would for growing the potatoes in soil. But instead of making a trench for the seed pieces, plant them on the surface of just below it. Loosely shake mulch over the bed, 6-10 inches deep. The very best mulch to use is loose, seed-free grain straw, Seed- free hay that has been fluffed up, leaves and/or well-dried grass clippings can also be used. As the plants grow, continue to add more loose mulch as though you were hilling up the plants. Be sure to keep the tubers well-covered at all times.
The result is excellent weed control, a continuous supply of moisture and reduced stress from heat. At harvest time, pull back the mulch. Your nest of potatoes should be clean, uniform and easy to gather.
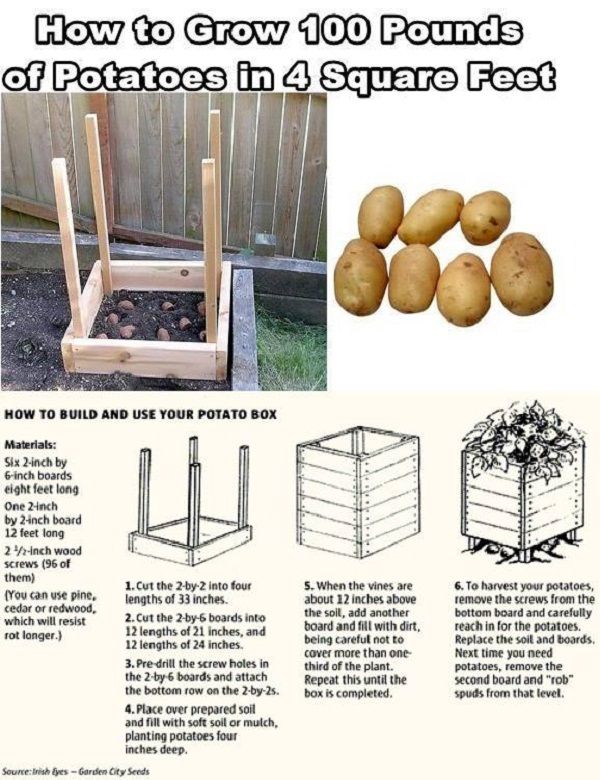
THE CAGE METHOD
Grow a few potato plants, each or in their own wooden box, crib, barrel or wire cage. The container should be about 18×18 inches at the base, about 24-30 inches tall, and able to be gradually filled with soft soil or mulch as the vines grow. Set each container atop a well-prepared fertile soil. Plant one strong seed piece and cover lightly with 4 inches of soil. As the vines grow, gradually fill the container with mellow compost, mulch or soil, but always make sure you don’t cover more than one-third of the vine’s new growth. With some varieties, the underground stolons which produce potato tubers keep on forming new ones for some time. In containers the yield may be increased 200-3000 percent compared with open-field culture. This is a great way to grow a lot of potatoes in a very limited space. We recommend doing this with Yellow Finn, Indian Pit, Red Pontiac, or the fingerling types. Watering requirements will be greater however, so check the cages or containers frequently in warm weather.
| STORAGE |
Potatoes keep best in the dark at 36 deg. to 40 deg. F., at high enough humidity that they don’t dry out, and given enough air circulation that they can respire (don’t forget, they’re alive). Light and/or warmth promote sprouting and will also turn the potatoes green. But, cold potatoes bruise easily, so handle them gently when moving them around in storage. We recommend burlap sacks, slotted crates or baskets.
| SOUTHERN GROWN POTATOES |
Early Spring Planting
Spring comes to the Deep South (Zones 8, 9, 10) when it is frequently too stormy in the North to ship your seeds without a high likelihood of them freezing in transit. To get seed potatoes securely you should order in October or November. Store the seed in your refrigerator (there are instructions on the preceding pages) until mid -January. Then bring the seed potatoes into the warmth and light and pre-sprout (chit) them for 2-4 weeks. Plant when conditions are favorable, sometime in February to early March, depending on your location. If you are uncertain when to plant or which varieties grow best at this time of year, ask a neighbor, the Extension Service.
Fall-Planted Potatoes
In zones 8-10, over wintering gets the earliest of the earlies. And if you have an extra old refrigerator, you can fill it up after harvest and hold your harvest through the summer until the fall crop. Here’s what to do. Order some seed now for delivery next September. These newly dug seed potatoes don’t sprout easily. First, chill them; put the tubers in a paper bag and place it in the refrigerator for 2-4 weeks. Then follow the directions for “greening” or “chitting” them. They will probably sprout in 2-4 weeks. Another way to induce sprouting is by putting apples, bananas, or onions in a paper bag with the tubers and placing the bag in a warm room (70 degrees F.). Ethylene gas given off from the fruits will initiate sprouting. Potatoes that are chilled for a month to six weeks will respond much more rapidly. You can also treat with Gerablic Acid. Plant your just sprouting potatoes from October through November. Choose a site that allows good drainage where winter rains may be heavy. By January, your potatoes could be emerging. By March, the vines may be two feet tall! Of course, weather will greatly effect emergence and growth. Be sure to provide protection from frost when it threatens. Dig new potatoes after blossoming. Harvest the rest when the vines have browned off. Save some seed in your refrigerator for a late-summer planting and fall harvest.